Best Easy Crochet Anime Tote Bag (Easy C2C Tote Bag ) Free Crochet Pattern
Are you looking for the absolute best free pattern for a crochet anime tote bag (easy c2c tote bag )? You have come to the perfect place! We have found this top-rated, incredibly easy crochet design that is guaranteed to be a huge hit. Whether you want a quick weekend project or a beautiful handmade gift, this pattern is fun, straightforward, and looks absolutely stunning when finished. Grab your softest yarn and let’s get started on your new favorite project!
Materials
Free Crochet Anime Tote Bag Pattern Details
- Worsted #4 Weight Yarn (I used We Love Yarn Classic Acrylic)
- US H-8 / 5 mm Crochet Hook
- 13.5 x 13.5 x 2 Canvas Tote Bag or Fabric for Lining (optional)
- Large eye sewing needle (optional – for lining)
Yardage
280 yards blue, 100 yards orange, 90 yards gray
Skill Level
Intermediate
Finished Measurements
13” x 13” not including strap (33 x 33 cm)
Abbreviations
US Terminology
- ch = chain
- st = stitch
- sl st = slip stitch
- sc = single crochet
- hdc = half double crochet
- rs = right side
- ws = wrong side
Mini C2C Technique
When adding a square (and for crocheting the starting square), you will ch 4 and hdc in the 3rd and 4th chs from the hook.
When you are building onto existing squares, you will sl st to the turning ch, ch 2, and then hdc 2 in the space created by the turning ch of the square you are crocheting onto.
New to mini C2C? Check out this step-by-step photo tutorial.
Notes
Do not fasten off the old color when you change to a new color of yarn. Just let it hang off the back of the project and pick it back up when you need it.
Line-by-line instructions are given starting from the bottom right corner and going up to the top left corner. Arrows indicate the direction of the work.
Keep all the yarn tails and color changes on the wrong side of the work.
Gauge
8 mini c2c squares = 4”
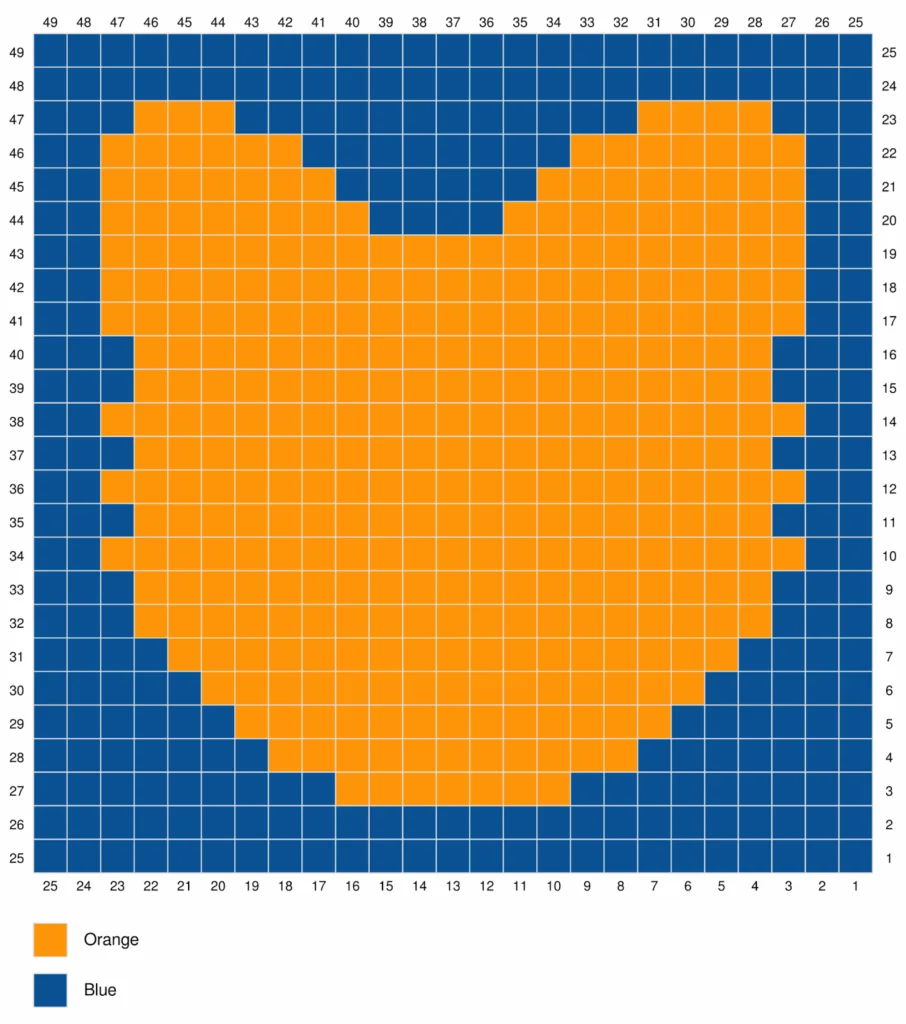
Cat Side
Scroll down for the graph.
← Row 1 [RS]: (b) x 1 (1 square)
→ Row 2 [WS]: (b) x 2 (2 squares)
← Row 3 [RS]: (b) x 3 (3 squares)
→ Row 4 [WS]: (b) x 4 (4 squares)
← Row 5 [RS]: (b) x 5 (5 squares)
→ Row 6 [WS]: (b) x 6 (6 squares)
← Row 7 [RS]: (b) x 7 (7 squares)
→ Row 8 [WS]: (b) x 8 (8 squares)
← Row 9 [RS]: (b) x 9 (9 squares)
→ Row 10 [WS]: (b) x 10 (10 squares)
← Row 11 [RS]: (b) x 3, (o) x 5, (b) x 3 (11 squares)
→ Row 12 [WS]: (b) x 2, (o) x 8, (b) x 2 (12 squares)
← Row 13 [RS]: (b) x 3, (o) x 8, (b) x 2 (13 squares)
→ Row 14 [WS]: (b) x 2, (o) x 10, (b) x 2 (14 squares)
← Row 15 [RS]: (b) x 3, (o) x 10, (b) x 2 (15 squares)
→ Row 16 [WS]: (b) x 2, (o) x 12, (b) x 2 (16 squares)
← Row 17 [RS]: (b) x 3, (o) x 12, (b) x 2 (17 squares)
→ Row 18 [WS]: (b) x 2, (o) x 13, (b) x 3 (18 squares)
← Row 19 [RS]: (b) x 2, (o) x 14, (b) x 3 (19 squares)
→ Row 20 [WS]: (b) x 3, (o) x 15, (b) x 2 (20 squares)
← Row 21 [RS]: (b) x 2, (o) x 16, (b) x 3 (21 squares)
→ Row 22 [WS]: (b) x 4, (o) x 16, (b) x 2 (22 squares)
← Row 23 [RS]: (b) x 2, (o) x 17, (b) x 4 (23 squares)
→ Row 24 [WS]: (b) x 5, (o) x 17, (b) x 2 (24 squares)
← Row 25 [RS]: (b) x 3, (o) x 17, (b) x 5 (25 squares)
Corner: Start decreasing on both ends
→ Row 26 [WS]: (b) x 5, (o) x 17, (b) x 2 (24 squares)
← Row 27 [RS]: (b) x 2, (o) x 17, (b) x 4 (23 squares)
→ Row 28 [WS]: (b) x 4, (o) x 16, (b) x 2 (22 squares)
← Row 29 [RS]: (b) x 2, (o) x 16, (b) x 3 (21 squares)
→ Row 30 [WS]: (b) x 3, (o) x 14, (b) x 3 (20 squares)
← Row 31 [RS]: (b) x 6, (o) x 10, (b) x 3 (19 squares)
→ Row 32 [WS]: (b) x 2, (o) x 10, (b) x 6 (18 squares)
← Row 33 [RS]: (b) x 6, (o) x 8, (b) x 3 (17 squares)
→ Row 34 [WS]: (b) x 2, (o) x 8, (b) x 6 (16 squares)
← Row 35 [RS]: (b) x 5, (o) x 7, (b) x 3 (15 squares)
→ Row 36 [WS]: (b) x 2, (o) x 7, (b) x 5 (14 squares)
← Row 37 [RS]: (b) x 4, (o) x 6, (b) x 3 (13 squares)
→ Row 38 [WS]: (b) x 3, (o) x 5, (b) x 4 (12 squares)
← Row 39 [RS]: (b) x 3, (o) x 6, (b) x 2 (11 squares)
→ Row 40 [WS]: (b) x 2, (o) x 5, (b) x 3 (10 squares)
← Row 41 [RS]: (b) x 3, (o) x 4, (b) x 2 (9 squares)
→ Row 42 [WS]: (b) x 2, (o) x 4, (b) x 2 (8 squares)
← Row 43 [RS]: (b) x 2, (o) x 3, (b) x 2 (7 squares)
→ Row 44 [WS]: (b) x 2, (o) x 2, (b) x 2 (6 squares)
← Row 45 [RS]: (b) x 5 (5 squares)
→ Row 46 [WS]: (b) x 4 (4 squares)
← Row 47 [RS]: (b) x 3 (3 squares)
→ Row 48 [WS]: (b) x 2 (2 squares)
← Row 49 [RS]: (b) x 1 (1 square)
Reference the chart below.
Rat Side
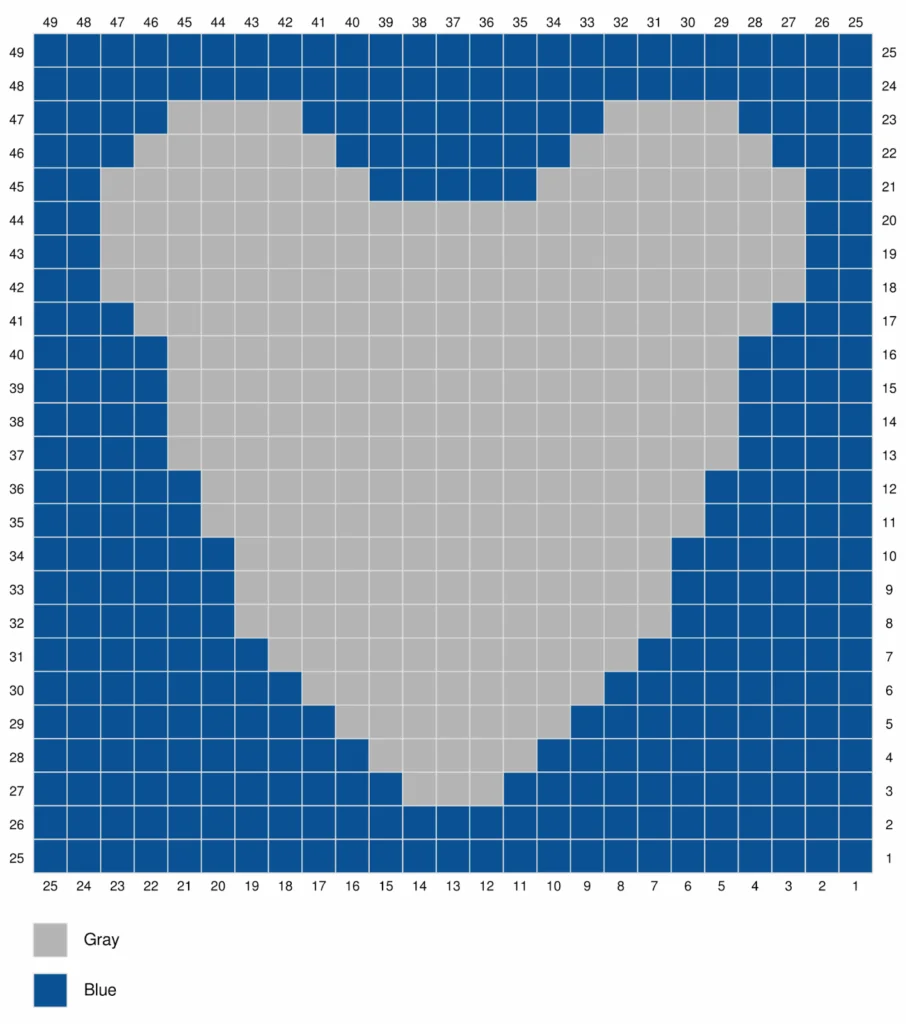
Scroll down for the graph.
← Row 1 [RS]: (b) x 1 (1 square)
→ Row 2 [WS]: (b) x 2 (2 squares)
← Row 3 [RS]: (b) x 3 (3 squares)
→ Row 4 [WS]: (b) x 4 (4 squares)
← Row 5 [RS]: (b) x 5 (5 squares)
→ Row 6 [WS]: (b) x 6 (6 squares)
← Row 7 [RS]: (b) x 7 (7 squares)
→ Row 8 [WS]: (b) x 8 (8 squares)
← Row 9 [RS]: (b) x 9 (9 squares)
→ Row 10 [WS]: (b) x 10 (10 squares)
← Row 11 [RS]: (b) x 11 (11 squares)
→ Row 12 [WS]: (b) x 12 (12 squares)
← Row 13 [RS]: (b) x 13 (13 squares)
→ Row 14 [WS]: (b) x 2, (g) x 6, (b) x 6 (14 squares)
← Row 15 [RS]: (b) x 6, (g) x 7, (b) x 2 (15 squares)
→ Row 16 [WS]: (b) x 2, (g) x 9, (b) x 5 (16 squares)
← Row 17 [RS]: (b) x 4, (g) x 10, (b) x 3 (17 squares)
→ Row 18 [WS]: (b) x 3, (g) x 11, (b) x 4 (18 squares)
← Row 19 [RS]: (b) x 4, (g) x 11, (b) x 4 (19 squares)
→ Row 20 [WS]: (b) x 4, (g) x 14, (b) x 2 (20 squares)
← Row 21 [RS]: (b) x 2, (g) x 14, (b) x 5 (21 squares)
→ Row 22 [WS]: (b) x 5, (g) x 15, (b) x 2 (22 squares)
← Row 23 [RS]: (b) x 2, (g) x 15, (b) x 6 (23 squares)
→ Row 24 [WS]: (b) x 6, (g) x 15, (b) x 3 (24 squares)
← Row 25 [RS]: (b) x 3, (g) x 15, (b) x 7 (25 squares)
Corner: Start decreasing on both ends
→ Row 26 [WS]: (b) x 6, (g) x 15, (b) x 3 (24 squares)
← Row 27 [RS]: (b) x 2, (g) x 15, (b) x 6 (23 squares)
→ Row 28 [WS]: (b) x 6, (g) x 14, (b) x 2 (22 squares)
← Row 29 [RS]: (b) x 2, (g) x 13, (b) x 6 (21 squares)
→ Row 30 [WS]: (b) x 5, (g) x 13, (b) x 2 (20 squares)
← Row 31 [RS]: (b) x 5, (g) x 9, (b) x 5 (19 squares)
→ Row 32 [WS]: (b) x 5, (g) x 8, (b) x 5 (18 squares)
← Row 33 [RS]: (b) x 5, (g) x 8, (b) x 4 (17 squares)
→ Row 34 [WS]: (b) x 4, (g) x 7, (b) x 5 (16 squares)
← Row 35 [RS]: (b) x 5, (g) x 6, (b) x 4 (15 squares)
→ Row 36 [WS]: (b) x 4, (g) x 6, (b) x 4 (14 squares)
← Row 37 [RS]: (b) x 4, (g) x 5, (b) x 4 (13 squares)
→ Row 38 [WS]: (b) x 3, (g) x 6, (b) x 3 (12 squares)
← Row 39 [RS]: (b) x 3, (g) x 5, (b) x 3 (11 squares)
→ Row 40 [WS]: (b) x 2, (g) x 6, (b) x 2 (10 squares)
← Row 41 [RS]: (b) x 2, (g) x 5, (b) x 2 (9 squares)
→ Row 42 [WS]: (b) x 2, (g) x 4, (b) x 2 (8 squares)
← Row 43 [RS]: (b) x 2, (g) x 3, (b) x 2 (7 squares)
→ Row 44 [WS]: (b) x 6 (6 squares)
← Row 45 [RS]: (b) x 5 (5 squares)
→ Row 46 [WS]: (b) x 4 (4 squares)
← Row 47 [RS]: (b) x 3 (3 squares)
→ Row 48 [WS]: (b) x 2 (2 squares)
← Row 49 [RS]: (b) x 1 (1 square)
Reference the chart below.
Cat Eyes
With white, magic circle or ch 2 and work into the 2nd ch from the hook.
Round 1: hdc 6, turn. (6)
Round 2: ch 1, 2 hdc in each st, turn. (12)
Round 3: ch 1, (hdc in the next st, 2 hdc in the next st) x6, turn. (18)
Round 4: ch 1, (hdc in the next 2 sts, 2 hdc in the next st) x6, do not turn. (24)
Ch 1, hdc 10 sts evenly across the side of the work. Fasten off and leave a long tail for sewing.
Cat Teeth (Make 2)
With white, ch 11, sc in the 2nd ch from the hook, picot stitch, sl st 8, picot stitch (see below), sc in the last ch and fasten off.
Picot Stitch: ch 3, sl st to the 3rd ch
Rat Eyes
With black, magic circle or ch 2 and work into the 2nd ch from the hook.
Round 1: hdc 8, sl st to join. (8)
Round 2: ch 1, 2 sc in each st around, sl st to join. Fasten off and leave a long tail for sewing. (16)
Adding the Details
You can use embroidery or needle felting to add the straight pupils to the cat’s eyes. You will also need to add a little white highlight to the rat’s eyes and a nose for the rat.
Felt is used to make the rat’s eyebrows, the cat’s mouth, the cat’s tongue, the cat’s nose, and the red mark on the cat’s forehead.
Details can be sewn or hot-glued on. (Fabric hot glue is recommended for maximum hold)
Finishing the Bag
Sandwich the backs of the two squares together so that the right sides are facing outwards. Sl st around the two pieces on 3 sides, working through both squares at once. Then sc around the top opening of the bag.
If using the canvas tote for lining, drop it inside the crochet bag and sew it in place using a wide eyed sewing needle and blue yarn to match the bag. (You can use thread instead if you prefer, but it’s a little fussier)
_________________________________
Love this crochet pattern? You might like these other free crochet patterns!
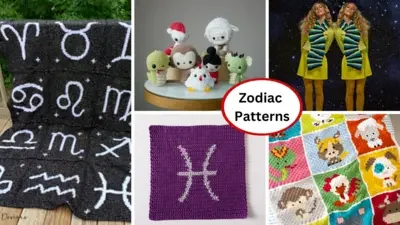
- Crochet Zodiac Inspired Creations – 10 Free Patterns